 Photography
Ring light 4.0: fiber optic TTL ring flash
Note from the author: my ring light pages have had hundreds of thousands of visits since I started writing them back in 2005. Fuzzcraft has been stampeded by StumbleUpon, has starred on Hackaday and DIYphotography, and is constantly being linked to from flickr, strobist and other blogs, forums, etc. I thank you all. It's nice to have done something that appeals to so many people.
There's something magical about ringlights. The unnatural light cast, the halo shadows. Yet the idea behind them is as clever as it is simple: looking through the light source.
Overview
Want to see more ring lights? See my full ring light overview page
Quick overview:
  |
4.1 |
Fiber optic TTL flash ring light, uses popup flash and 67 fiberglass bundles |
  |
4.0 |
Fiber optic TTL flash ring light, uses popup flash and 120 plastic fibers |
  |
3.1 |
2 CCFL continuous ring light |
  |
3.0 |
4 CCFL continuous ring light |
  |
2.1 |
52 mm filter mount 140 LED continuous ring light |
  |
2.0 |
52 mm filter mount 90 LED continuous ring light |
  |
1.0 |
Simple, 30 LED continuous ring light |
You can't deny I'm full of ideas. After 5 earlier attempts at getting shadowless light onto a macro scene, some good, some bad, this is yet another approach: fiber optics. I haven't seen many people try this. The only good example is from a gentleman named Gene F. Rhodes, whose website has been offline for quite some time, but he's far from enthousiastic about it himself. Pete Ganzel did a project with a solid acrylic light guide. Other fiber flash projects here and here, but 6 or 12 fibers aren't going to do the trick. I aim to put over 100 fibers into this project.
I got myself 100 m of 1 mm unjacketed acrylic optic fiber. This is the stuff they use for star ceilings. I got it from fiberopticproducts.com. The window on my main camera's internal flash measures 20 x 6 mm, so it'll fit 120 fibers. Covering the whole window with fiber ends will put nearly all the available light (theoretically 78%) into the fibers and onto the subject, but the high fiber count also makes it possible to get very evenly distributed light without the need for a diffuser. I considered using larger diameter fibers, but I suspect these are much stiffer and won't spread the light as evenly as the small fibers. Not having to use a diffuser will not reduce light output, while still having the option of adding one when light output is not very important.
Why am I using the internal flash for this and go though the trouble of mounting over a hundred little fibers? For several reasons:
- Power: even at its relatively low power level (most internal camera strobes are around 10 Ws), the internal flash still blows away continuous lights, including 1,000 Watts tungsten bulbs, let alone LEDs
- TTL auto exposure: on most cameras, the internal flash has a very sophisticated TTL light metering system attached that almost guarantees accurate exposure with every single shot
- Portability is an important factor as well
- It has to be low cost (duh!). A real ring flash is not worth the investment for me. Building a real ring flash myself is an option, using a number of disposable camera flashes, but something like that will not be very portable and potentially dangerous, nor will the power level be adjustable. It won't even support TTL light metering. Maybe if I let it exactly mimic the master flash this might be worth a shot. Ring light 5.0 ..?

For the ring mount, I got a 72 to 77 mm filter step-up ring. I ordered a whole bunch of rings so I can fit the ring to other (and future) lenses. The only problem with short lenses (like the 50mm 1.7) will be the excess length of fiber. But it remains to be seen just how much trouble it will be.
Click thumbnails to zoom in. Click again to zoom out, or use cursor keys to walk through all images.

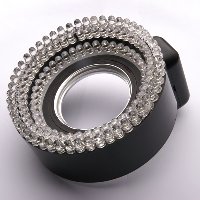
1. So, the dreaded cutting of plastic rings starts again! I'll save you the tiny details. For some ring cutting examples, see the previous ringlights. This is the mount. The gap is there to be able to add a connector or something like that.

2. Attached to the lens it looks like this.
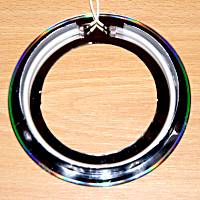
Then it occured to me, that if I make a universal base mount, I'd be able to exchange stuff without having to make a new filter mount every time. And thus the fuzzmount was born! The ring you see above is all there's to it, really. Any attachment will get a rear extended tube that shifts snugly over the fuzzmount. The first attachment will be the fiber ring light.
Next was fitting the 25 cm fibers. The actual outer ring to attach the fibers to measures 95.5 mm in diameter, meaning a circumference of 300 mm. For 120 fibers, this means a spacing of 2.5 mm. I prepared a plastic connector housing with a spacing of 2.54 mm -close enough- to hold the fibers in place while pressing them into double sided tape temporarily. In addition, I stuck a lined paper strip onto the tube for fine tuning. After everything's in place, another plastic ring will act as a cover and the whole thing will be glued tight with polyurethane. It's important to use a socalled "inert" glue for this, like polyurethane, because any solvent based glue might damage the fibers. To come to this conclusion, I tested several kinds of glue:
- Hard plastic glue (for PVC and ABS) dissolves the fiber
- Neoprene contact glue (called "Bison kit" in Europe) is tough as heck, but slightly eats the fiber
- Silicone (caulking) doesn't stick
- Hot melt glue (tack gun) melts the fiber
- Superglue (cyanoacrylate) eats the fiber surface
- Modeling glue (for polystyrene) doesn't stick
- Pattex blue backed double sided tape (NOT the red backed stuff) is OK for temporary fixing
- Pattex polyurethane glue ("Krachtlijm" in Dutch, "Colle Forte" in French) is the best I've found. This stuff may have many different names. Just look for the word polyurethane, and make sure the stuff doesn't foam up, like many polyurethane glues do.

3. The fiber spacing tool.
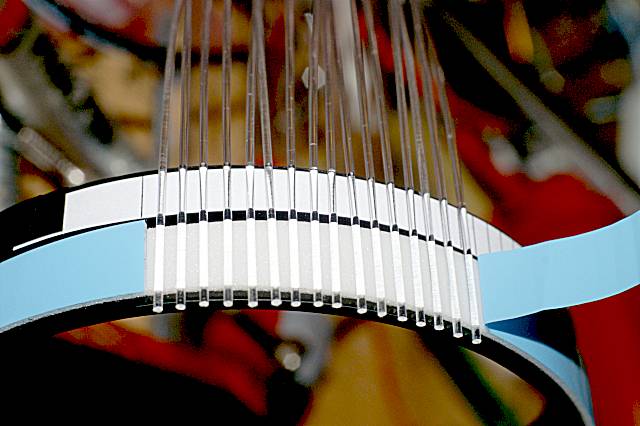
4. Sticking the fibers onto double sided tape.

5. All fibers done, outer ring in place (there's still a gap to fill), glue setting while a tightened string presses everything together.

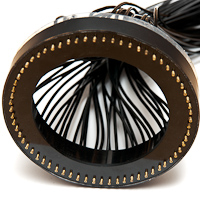
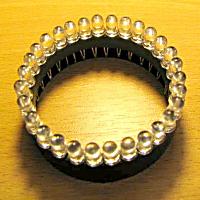
6. And this is the contraption I ended up with. You can see the fuzzmount in the center with the ring holding the fibers around it, fiber ends polished and all.
For those of you who will attempt this after reading this article, here's a tip: get proper tools to polish the ends of every single fiber! Otherwise forget the whole project. If you don't polish you may easily lose 75% of your light output, because the light will hardly enter the rough fiber end at the flash head side. It doesn't have to be shiny like a mirror, but leaving rough cuts would seriously spoil the results. Polishing requires you to get a 3 μm polishing film and takes a lot of time, not to mention it's tedious as heck. But patience is a virtue. On the other hand, you're already halfway there if you use a razor blade or other dangerously sharp blade to cut the fibers in the first place.
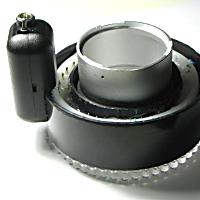
Next is connecting the 120 fiber ends to the flash head on my camera. It has to be easily detachable, preferrably with a clip thingy or something. Disappointingly, I discovered that, while 1 little fiber is very flexible, managing a bundle of 120 of these things is kind of a hassle. Putting the spring tension of this bundle onto the pop-up flash mechanism might damage it. Luckily, I also discovered that the temperature-controlled hot air soldering gun at my work place (A Weller WMD-3) is the perfect tool for safely and very slowly forming the fiber, and thus easing the tension. A hair dryer, very carefully applied, could also do the trick (at your own risk!). A reader got great results with hot water.

7. On with the show! I took some scrap pieces of acrylic and made a place holder for the fibers. Remember that nearly every camera is different when it comes to the shape of its pop-up flash, so what's shown here only works for the Konica Minolta Dynax/Maxxum 5D. But the general idea should work for many cameras.
It proved impossible to get the fiber ends to line up correctly in the window. What I did was push them all through, making sure the shortest fiber was also sticking out the window. Then I glued everything tight. I can't stress enough to use polyurethane glue for this. The glue takes a few days on a warm, humid place to harden completely. Then, using a razor blade or scalpel, cut the fibers, so they are flush with the adapter. Depending on how neat the cuts are, you may want to polish the ends with polishing film (or a dremel and a felt polishing wheel, if you can't get real polishing film).

8. This is how it all adds up.
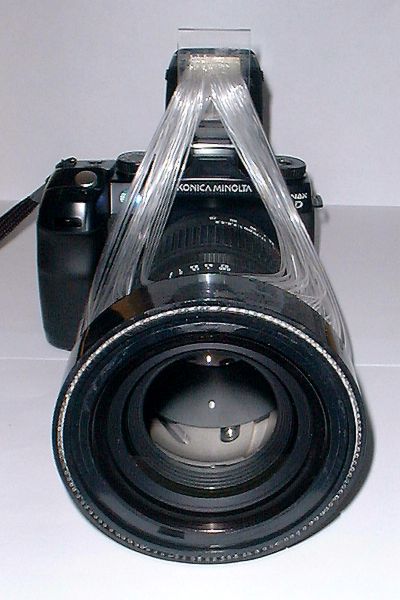
9. View from the front.
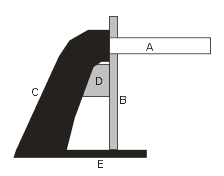 A cross section of the adapter:
- A: fiber bundle whose spring tension keeps it pressed lightly against the flash head
- B: support plate that holds the fiber bundle at the correct height from the top of the camera
- C: flash head
- D: guide that slides snugly underneith the bridge shaped flash head and prevents the bundle from snapping off the head
- E: top of camera housing
As you can see, I meticulously formed the bundle into a downward angle. The flexibility of the bundle leaves a lot to be desired, but the way it is now, it fits the Sigma 17-70 lens (my best performing macro) fully extended and every lens that has about the same length. With the bundle split in two halves, operation of the the zoom and manual focus rings is surprizingly easy. The connector plate is held in place by a small amount of spring tension from the bundle, which obviously increases when the lens is retracted. But, at this time, I see no need to improve the fit of the adapter.

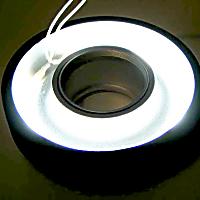
10. Now, the answer to the question you've all been asking: how does it perform? Image straight from camera, ISO100, 70 mm, f/16

11. Well, to tell you the truth: it works absolutely great! Image straight from camera, ISO100, 70 mm, f/5.6

12. Shot in near darkness, using strobe focus assist and red-eye reduction. Again, straight from camera, ISO100, 70 mm, f/4.5
Now the incredible part, which is proof of success to me: for the bottle photo above, I was able to completely stop down to f/36 at ISO 100 and still the flash hadn't run out of power! I did notice a magenta color cast at f/36, which may be due to reflections from the direct surroundings, probably my own face. But who knows, maybe the lens was at fault. It doesn't matter, because no SLR lens is very sharp at f/36.
Now the other incredible part, which is what this project has cost me:
- 30 m of 1 mm plastic optic fiber: about € 10
- Filter step-up ring 72-77 mm: € 7,50
- Monacor MBR-85 bass port (for the plastic rings): appx. € 10
- Glue and tape: appx. € 5
Total amount: about € 33. The bass port came from my junkbox, and glue and tape are things every DIYer should have anyway. So what I really spent on this is more like € 17.
Some recent shots with my Sony Alpha 700. The standoff doesn't really fit perfectly, maxing out the flash power quite rapidly at f/16 and ISO 200, but I just wanted to try the ring on the Alpha 700, and the results are quite good. After this 10 minute shoot, however, the smell of melting plastic became apparent, and I had to dismount the ring to let the standoff cool down. The battery was draining fast as well, with the flash popping at such high power.

13. ISO200, 70 mm, f/16

14. ISO200, 70 mm, f/8

15. ISO200, 70 mm, f/13

16. ISO200, 70 mm, f/16
What I would've done differently is the length of fiber. I started out with just 25 cm per fiber strand, and it proved to be a lot of trouble. I believe longer fibers will put less stress on the camera parts, especially the pop-up flash. The dangling bundle below the camera is probably something one would just have to get used to. But for such a low budget solution with such astonishing results, this is a small price to pay. Maybe I'll build another one, so I can use them with different lenses, especially my sharpest tool in the shed, a 50 mm f/1.7, and do portraits. For this to work I'll probably also have to use a ring diffuser.
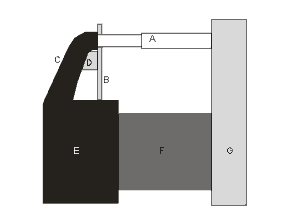
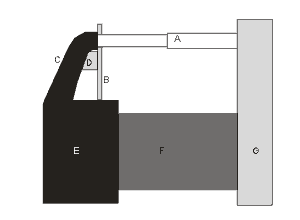
Another option would be to use a telescopic light shaft to deal with different lens lengths. The ring would simply get a protrusion where the light will enter from a rectangular telescopic tube running straight to the flash window. Something like this:
 Hover over the drawing to see the effect
- A: telescopic rectangular aluminium tube, polished on the inside
- B: support plate
- C: flash head
- D: guide that slides snugly underneith the bridge shaped flash head
- E: camera body
- F: zoom lens or non-internal focus lens
- G: ring shaped light guide
Fuzzcraft.com comment system 1.1
2011-06-19 Richard
Brilliant! I just had exactly the same idea and that's why I found you and that's why I'm making this comment. We see 100% eye to eye on this implementation. Great idea (if I say so myself) and excellent DIY workmanship. You can be proud.
2012-09-12 Siegfried Gust
I had the same idea when contemplating how to create a ring flash that runs of the flip-up one or even a hot shoe flash. When googling it I found your site. I have a few questions/suggestions. Do you know what the light transmission is on acrylic vs. glass fibers? Glass fibers supposedly can have up to 99.99% light transmission. That's awesome, if you could achieve it in a DIY project. Also with the acrylic I believe the best solution would be to avoid the glue altogether on the side that receives the light. Better would be to make a tool for heating and squeezing it into the right shape so that you could melt it into a solid face to eliminate any light loss. would take some tinkering but a metal U-shaped piece with the right interior width and a block of the same width to apply pressure. Then heat till it fuses. This is something that I might tackle in the coming year if I get around to it. Any thoughts would be appreciated.
2012-09-12 Admin
Hi Siegfried. Instinctively you would say light transmission is important, but it's not. The popup flash of a camera puts out so much light, even losing 75% (that's just 2 stops) would mean you have still enough power to light a macro at f/22. Beyond f/22 you would use focus stacking anyway, to keep the sharpness up.
2012-11-11 Stan Rogers
The cable has an attenuation of 0.18dB/m, so you lose one stop (3dB) for every 16.7 metres of cable length. That's in straight runs, though; tight bends will cause significant out-the-side leakage (since the angle of the light travel means you'll lose total internal reflection). If you keep the bends loose (no significant physical stress to make the bend; smaller fibres can take tighter bends, and the physical properties of the fibre match the optical properties pretty closely) you won't see any appreciable loss.
2012-11-11 Admin
Thank you for your insightful comment. However, the attenuation of the optical wire itself is hardly the issue here. It's the light that doesn't enter the wire *at all* that causes the most loss. Still, with a light loss of 2 stops there's enough light, even from small-ish popups.
2012-12-19 Fiber cleavers
This is a unique concept and great idea you implement on light transmission.Graphically implementation is good.
No signing up, no censoring, no hassle, no strings attached, no nothing.
Please, English or Dutch only. If you don't really want your message to appear in public, consider contacting me privately.