 Photography
How to build a flightcase or road case
Flightcase or road case? The term "road case" is the more commonly used term in the United States, while "flightcase" is the industry accepted word in Europe. I'm a European citizen, so I'll be using the term "flightcase".
It seems a lot of people like to build their own flightcases. Quite understandable, because a good ready-made case is expensive and building one yourself will cut the cost in half, roughly. You also get to choose your own dimensions and add extras. When you search the web for a flightcase how-to, you are left mostly empty handed. There are not a lot of DIY guides. My flightcases page used to take a lot of hits, and I got quite a few questions about the subject, so I decided to write this guide. I'll show you what tools and materials you need, what to look for, the inside scoop, how stuff works, and all that stuff, and I'll even provide two example cases.
So how do you go about this? The first thing you should do is locate a shop that carries aluminium flightcase extrusions and steel parts. Penn-Elcom is a large manufacturer of flightcase parts. I am very lucky to have an excellent supplier about 15 miles from home (Electra Breda). If it weren't for them I would've never started building cases. In 2013, Penn-Elcom established a website, Penn-Elcom Direct, which sells parts directly to large and small customers, catering to the whole of Europe. It's based in Germany, but offers a multi language (English, German, French, Spanish, Dutch) ordering process.
If you're not in Europe, you could look for one of Penn-Elcom's distributors. Penn-Elcom is a large, world-wide manufacturer, so they're probably everywhere. In any case (pun intended), they have a nice overview of what kinds of parts are available. Note however, that a lot of parts on Penn-Elcom.com are special order, and will probably not be available in retail. Whatever you do, don't try to be too cheap. A well-constructed flightcase built entirely out of standard flightcase parts is almost indestructable, because the parts form a proven, interlocked, system. Leave out one system component and the case becomes much less sturdy. By far, the most important part in a flightcase are the location extrusions, sometimes called closing extrusions.
Please note: I'm not a professional in this matter. I won't build you a case. I've built about a dozen cases and cabinets for personal use and have applied the knowledge gained from more experienced people into those cases.
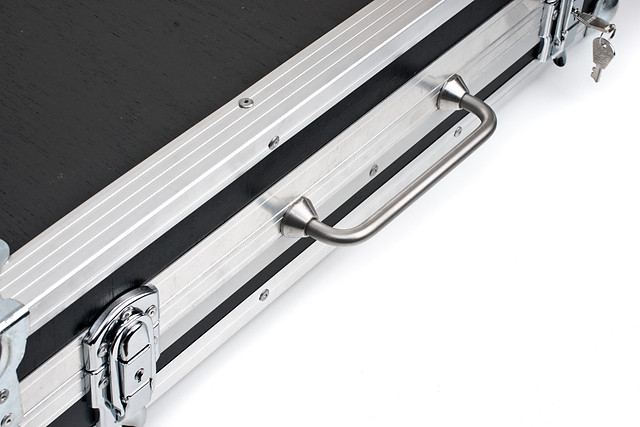
A case with most parts named:
What will you be needing?
Tools
Click thumbnails to zoom in. Click again to zoom out, or use cursor keys to walk through all images.

Obviously, you're going to need an electric drill and a hack saw or jigsaw (pictured is my personal work horse). To make precise 45° angle cuts, a miter jig is pretty much a necessity. If you want to cut your own panels (which I advise against when you're a beginner), a circular saw or table saw is preferred, but I get by with a jigsaw. You could of course do all wood cutting by hand. At the very least you'll get a decent workout!

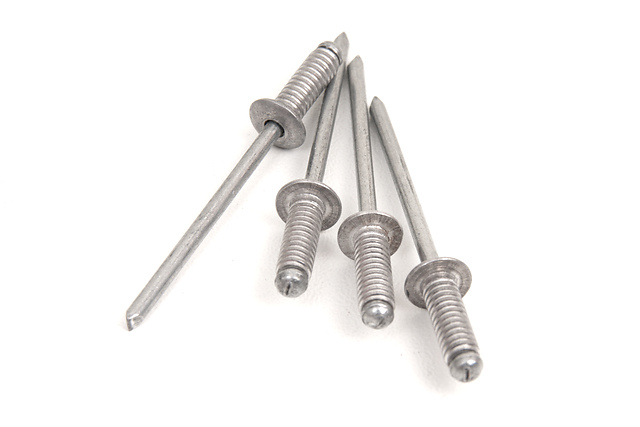
And you need at least one special tool: a pop rivet wrench. These can be had for about US$20/€20. You'll also need special wood-type pop rivets, the "groovy" ones. These can be hard to find, but the aforementioned shops should have them. Do not use plain pop rivets if there's nothing but wood for them to catch onto! They will not last! Been there, done that (fortunately, when a handle comes loose, the equipment is still protected by the case). I use 4 x 12 mm grooved pop rivets, as pictured. You press the to-be-fixed part firmly into position, and using the part as a template, drill all the way through the wood, then pop it, and continue to the next fixing hole. Alternatively, you could use screws. A bit more work and hassle, but definitely a possibility.

And I'd like to mention this separately: I use a very high grade 4.2 mm Cobalt steel (M42) drill bit. A razor sharp, long-lasting bit (I've been using the same bit for years) will save you a lot of frustration. Believe me. Not only will you be working faster, you'll also experience less "runaway", because the bit will start cutting the moment your drill starts to turn. The bit you see in the picture is my actual one; it's drilled thousands of holes.
Parts

9.5 mm (3/8") plywood, plain or prelaminated. Prelaminated is expensive, but easy and incredibly durable. Plain plywood can be painted, preferably with a poly-urethane based coating. MDF is not suited for flightcases. Plywood is lighter, more durable, and more resistant to dings & dents, scratches and moisture.
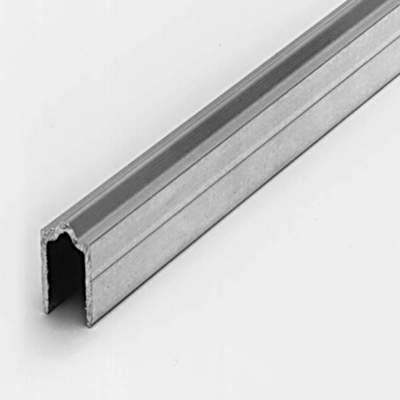
Closing extrusions, also known as location, locking or mating extrusions. These go in between case and lid(s) to make the closed case solid as a rock. They come in male/female, or reversible, and some types have gasket grooves for water tightness. These also come in lid maker style, where they're combined with an edge liner to build shallow lids with a single plywood panel. I haven't seen these in retail, though.

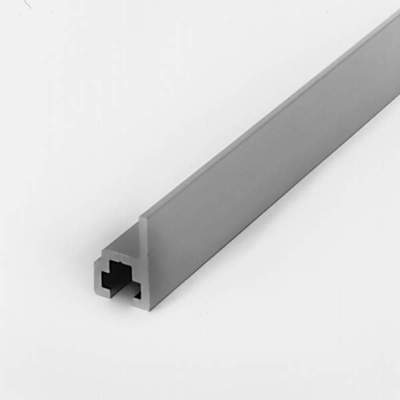
"L" or "single angle" extrusions. I prefer the 30 mm size. Used as edge liners. For heavy duty cases these also come in double angle style, where an extra fortification runs along the inside of the case. With these kind of edges, you don't build a wooden box first, instead you just pop rivet the panels into place.


Butterfly latches or drawbolts to keep the case closed. The recessed latches look professional, but ask yourself if you really need recessed ones. They are much harder to install, and break the location extrusion, making the case slightly less rigid. Surface mount latches are much easier to install.


Ball corners. Either stackable or not. Make sure they fit, if you plan to have a shallow lid. Most suppliers have 2-pronged ones for this, or even special ones for lids, with integrated L-brackets.

Hinges, if you need them. Most suppliers carry removable ones and ones with a stop. The removable ones are usually not very sturdy, so if you must have a removable lid, use one hinge every 4-6 inches. I recommend at least 4 hinges on a 19" wide case. You could also fit extra latches on the hinged side, just to be sure.


Handles. I prefer recessed sprung handles. They're sturdy and don't take up much space, allowing you to build stackable cases even with handles on top and bottom. For a flat case, get a strap handle or a suitcase-style handle.

L-brackets (a.k.a. cabinet braces). Use them to "make ends meet", to cover up burrs and exposed sharp edges of the closing extrusions.

Dishes, to install cable sockets or switches.

Casters, if you need them. Consider the braked swiveling type. Consider ball bearing wheels for heavy and rough use. Thank me later. Budget tip: Check IKEA.
For 19" racks, I prefer the sliding rail system. These allow you to slide in any number of caged nuts, allowing for a flexible vertical positioning of the equipment. I find it very useful to leave small vents in between an amplifier and a processor type device. The inside case width I use for these rails (mind the closing extrusions if you want the rails to sit flush with the case edges) is 19.25 inch, but this may vary across manufacturers. My point is: don't make the inside of your case exactly 19" wide.
Building the case
Step by step:
Construct a closed box out of plywood. Use poly-urethane or normal white glue and thin 20 - 25 mm (3/4 - 1") nails, or tacks. The nails are only needed to hold everything together while the glue sets. You absolutely need to build it as a closed box first, so the closing extrusions will fit perfectly. Do this now, and thank me later. There's no way you can put together a perfectly matching box and lid. If the edges don't line up perfectly, the case will never close perfectly. Been there, done that. Please note that closing extrusions take up some space; about 6 mm (1/4"). This will make the case slightly deeper than the box you made.
Cut off the lid(s). Do this before you paint, or you'll scratch the paint while it's still getting up to full strength. For the reason stated above (to make sure the case closes perfectly), mark every part's orientation!
If you're not using laminated wood, paint the parts with some tough and scratch proof stuff. I use black poly-urethane paint for outdoor purposes. Don't put too much effort into the edges, they'll be covered anyway. For best results: sand, use a primer, sand lightly, put on a coat of paint, and depending on the opaqueness, sand very lightly and put on a second coat. Between each layer, stick to the directions on the can regarding its "dry to recoat" time.
If you have dish-type recessed butterfly latches, hinges and/or handles, cut out their outlines. Again, you'll have to account for the added depth taken up by the closing extrusions! I always use some scrap pieces as guides. Alternatively, you can first fit the closing extrusions and then fit the recessed latches. I've done this several times. But in the end I find it easier to precut the dish outlines rather than first making the location extrusion fit perfectly, only to cut it anyway later on, if you get my drift. In most cases, I pick surface mount latches, because they are much easier to install.
Fit the closing extrusions, cutting them in 45° angles, preferrably with a miter saw. I built a custom miter jig especially for this: a piece of 9 mm plywood mounted upright into a standard miter jig. It's worth the trouble for the (at least) 16 cuts you need to make for a case with a removable top and bottom.
Line the edges with L-extrusions using 2 pop rivets every 15-20 cm (6-8 inches) or so. You don't have to run them full length and miter them; just make sure they run underneith the corners you'll be putting on later.
Cover the transitions from closing extrusion to edge lining with L-braces to minimise the risk of skin cuts from the miter-sawn edges. You will probably have to round off the edges underneath the braces a bit. Because this step fixes the closing extrusions, keep the case firmly closed while you do this, using a couple of table clamps, a ratchet strap or weights. The braces can also be used to connect L-extrusions together on larger cases. That way you don't have to throw away pieces that aren't long enough.
Cover the corners with (duh) ball corners. Some of these require filing down the woodwork a bit. Please note that anything you put on the woodwork for protection adds quite a bit to the external dimensions, especially the larger ball corners.
Pop on the hinges, latches, and/or handles. I usually don't use rivets along the closing extrusions, but for very large cases this might be needed.
Install casters if you need them. Don't use screws or rivets for this; bolt them through and through with washers and nuts or T-nuts, and use something like Loctite or self locking nuts to prevent them from loosening. If your case is likely to tip over, use a separate base panel to separate the casters wider apart, for improved balance. Casters can be made removable if you install them on quick-release plates. Wheeled cases can be made stackable by installing caster dishes on top.
In a nut shell, that's about it. The main trouble will probably be getting those extrusions and parts. The rest shouldn't be a problem and requires minimal skills with wood and tools. Prior experience will be extremely helpful, though.
Example
This photo gear flightcase project also has its own separate page. But wait! There's more: a second photo flightcase.
As an example, and since I need one, I will be building a photo equipment suitcase. I figured it would be fun to use a standard hardware store 61 cm wide sheet and use it as efficiently as possible. So the case is going to be 61 cm wide. For my largest lenses to fit and still have some shock buffer, the case needs to be 12 cm high on the inside. Coincidently, Penn-Elcom has lid ball corners for 7 cm lids, so if I use two of these across the height of the case, the case will be exactly 12 cm, plus I won't need separate L-brackets and everything would sit nice and flush. But there's a small catch: because the male/female extrusions are not symmetrical, the female side has to have a 5 mm shorter wood panel for the separation line to be exactly in the middle. The reversible extrusions have the same problem. So for everything to indeed line up, and with the female extrusion on the bottom, I need to cut the bottom lid 5 mm shorter than the top lid.
Unfortunately, cutting this out of a single standard 61 x 122 cm sheet gets me a case depth of only 35 cm, so I'm going to cheat a bit and use a piece of scrap ply for one of the sides, increasing the depth to a more useful 41 cm. The circumference of the case along the front, sides and back will be 2 x 61 + 2 x 43 cm = 208 cm. Edge lining will be needed for both bottom and lid, so I'll need 416 cm. With these, you can always use slightly shorter cuts, since the corners will already have covering, so 4 meters will suffice.
Panel dimensions:
- Top and bottom: 61 x 41 cm
- Front and back: 61 x 13 cm
- Left and right: 43 x 13 cm
Bill of materials:
- one piece of 61 x 122 cm x 9 mm plywood (and a scrap piece)
- 1 length of 2 m male and female location extrusion (and some scraps)
- 2 lengths of 2 m single angle extrusion
- 8 lid ball corners 70 mm inside length
- 2 strut hinges
- 2 draw bolt latches with locks
- 1 suitcase handle
Since this is going to be a suitcase, butterfly latches are really unnecessary. I'm going to use simple lockable draw latches for this case. To prevent inadvertent dislocation of the case and lid, I'll not be using lift off hinges, but strut hinges.
So with all the calculations ready, let's hit it off. I'm going to follow my own step-by-step plan. Since I'm not using dish latches, step 4 is omitted. And since I'm using ball corners with integrated braces, and casters aren't needed, steps 7 and 10 are also omitted.

Construct a closed box out of plywood. If you need a step by step plan on how to put six wood panels together, it might be a good idea to try a less complicated project first. As you can see, I used hardwood ply, and if you look closely, you can also see I used tacks to put the box together. I also marked the separation line with a pencil.

Cut off the lid. I marked the bottom and lid with arrows on the inside, so I'm absolutely sure as to how they fit best.
Paint the parts with scratch proof black poly-urethane paint. I used half a spray can of primer that I had lying around and applied two coats of black paint. As you can clearly see, I made no effort at all to paint the edges.


Fit the closing extrusions, cutting them in 45° angles. In the second image you can see how it actually works. The bottom will catch the lid, forcing it into position.


Line the edges with L-extrusions. For this case I used 20x30 mm extrusions. The corners look like a hack job, and ideally, you'd miter them, but this will all be covered by the metal corners.

Close-up. This is what the pop rivets look like on the inside. I drilled all the way through the plywood, but the rivets compress into the wood completely. A little sandpaper will remove the burrs and make it flush. Now you can use very thin foam sheets, like I do, without the rivets showing through.


Cover the corners with ball corners. Keep the case firmly closed while you do this, using a couple of table clamps, or a ratchet strap, because this step fixes the location extrusions. The corners you see here have integrated braces and as you can see, I was a millimeter off when separating the case and lid. Under normal circumstances, this would be no issue. You would use braces and separate corners, and a piece of L-extrusion in between.


Pop on the hinges, latches and handles. Pop the location extrusions too, if you feel the need (I usually don't). Leave the clamps or ratchet strap. I put some steel washers under the hinges at their outer fixing points to prevent skewing. The large draw latches I used here required longer 4 x 18 mm pop rivets.
Originally I bought a sprung handle, but it was too large and would just hit the floor. So I went through the scrap heap at work and found this great looking stainless steel handle bar. It's fixed with two M10 nuts, so I can still unbolt it and put some rubber tube over it for carrying comfort. The aluminium strip under the handle's rivets is for aesthetic reasons.

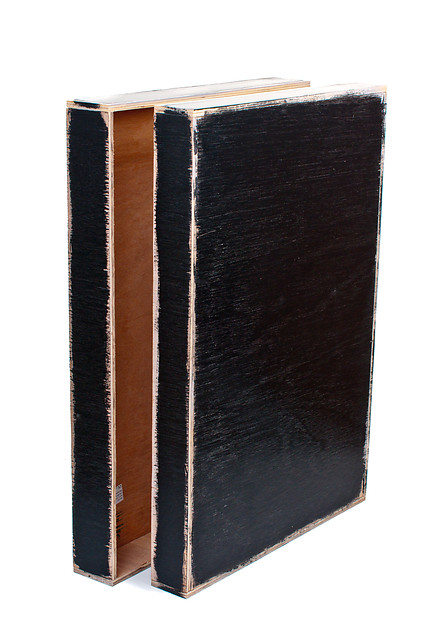
The end result. Looking good!
Those were the basic steps for the exterior. Since I want my photographic equipment well protected, I'm going to make a semi fixed divider sytem.

The interior. The lid was lined with egg crate foam. Then I put 2 ridges along the width of the case, making two 10.5 cm deep lens storage compartments. Everything was lined with self-adhesive neoprene foam. These are leftover cuts from work. I found some plastic panels to use as smaller vertical dividers.
Now the dividers are in place and I've pretty much settled on a layout. The only thing missing is a place to put the really small stuff, but I'm using a plastic box for now.

For another flight case example take a look at Photo flightcase 2.
Fuzzcraft.com comment system 1.1
2011-05-04 sonni rosyid
Nice DIY Flight Case. and WOW you're Minolta USER.
Awesome.
2011-05-15 Jim
Excellent article, thanks! :-)
2011-06-06 Flight Case
As a professional flight case manufacturer for 30 years I have to admire this article. For any one wanting to build their own flight cases I have never seen such a well documented instruction set.
2011-06-18 ben
thank you. after building (some mediocre) DIY flight cases myself, i wish i had found this article sooner.
2011-07-18 Laurenz R
Joris, I'm almost there :)
http://laurenzrabaut.blogspot.com/2011/07/making-flightcase-for-my-wacom-cintiq.html
2011-07-20 buzz
Brilliant! Great tips. Thanks
2011-07-30 Chris Pancho
Thank you SO much for this article. I'm going to attempt to make my own flight case for my pedal board for my guitar effects. If you have any pointers for musicians.. please email me! journalofthewhills@me.com
2011-09-26 Quality Flight Cases
Wow. I've been a professional flight case manufacturer for years and should probably not admire the detail put into this post but I just can't help it.
Fantasticaly detailed...Nice work!
2011-10-09 Oliver from Normandy
Thank you for this detailed instruction. I thought I already had all the information I needed, but you mentionned a very precious detail : the fact that first you build an entire box and then cut the top ! I will have to build a couple of cases for my lighting material and will follow your instructions ;-) Thanks for the time you spent on sharing your knowledge with us.
2011-10-12 FlipFoto
Great article. Very useful!
2011-10-18 Adam Callaway
Hey, Im constructing a touring flight case for my A2 product design. I am looking at constructing Ball corners myself, do you have any advice on how I can do this? Materials, techniques, formers?
Cheers man
2011-11-24 Stephen Andrews
Hey ! I Just thought i would write in to say thanks to your awsome website particuarly around the flightcase build, i was inspired to make my own. I am in a band (Dead To Life) but seriously cannot afford to buy flight cases.. i have quite alot of tools, esp the ones for this so no extra expense there, i have some/limited DIY background, but so far im enjoying the build. I got to the point of cuting the boxes, aboutto apply paint and protection varnish. One thing i kind of did wrong, was that i had not seen your guide before i had set off to buy materials and ended up buying MDF, its around 10MM thick. I had decided to also reinforce the base of the combo amp flight case with 9mm Plywood (which i bought after reading about your guide). I glued that onto the base pannel with "no more nails" glue and plan to nail that together too for added strength. I have all the extrusions and hardware as specified in your guide. most of it i got from ebay. One thing im stuck on is will i be "ok" riveting ( with groovy, wood rivets) through the MDF or should i use washers on the inside too? Thanks so much for this guide anyway.. really awsome work.
(Comment moved by admin)
2012-01-12 Louis
@Stephen Cannot judge your bankaccount bu if possible: Leave the MDF and go for Plywood!
MDF is:
- much heavier
- less resistant to water (could ruin your case at once)
- far less suitable for
BR, Louis
2012-02-08 Markus
very nice!!!
thanx for sharing!!
2012-02-14 David Futers
I will thank you sincerely for pointing me to the construction of the closed box first, ensuring that the joints fit. Why did I never think of the before. Great and very useful artical
2012-02-17 Flight Cases
Great article. Fantastically detailed and very useful!
2012-03-10 castors
Ball corner is necessary as an alternative for small wheels. It will make the case a lot easier to move.
2012-04-02 thefakedoctorphil
Yes Mate particle board is the scourge of any quality construction Stay Well away from it and protect forests
GRP sheet is super strong if a little more challenging in construction technique and ... wear a mask
2012-04-11 Mystic
Finally! I not only found some detailed instructions on how to build these things but they are written by someone who has actually built them! It only took several hours and a couple dozen Google searches to find you ;O) Thank you for the link to the hardware (Penn-Elcom). I did come across them halfway through my searches but I find it funny that there aren't too many companies out there selling this type of hardware. I did find these guys --> Reliable Hardware http://www.reliablehardware.com/ (copy and paste into address bar) Also Custom Foam Insert http://www.carrycasesplus.com/index.php ... for specific foam inserts. Ohio Travel Bag has telescoping handles and other hardware and they are a wholesale outfit http://www.ohiotravelbag.com/ ... they also have a retail site for those who don't have a resale license but I'm not sure what it is. You can write or call them. Of course, my being in the United States, these companies are all in the U.S. so I'm not sure how this affects my neighbors across the planet :O) but I do hope it helps.
Again thank you so much for the very detailed instructions and listing all the hardware and tools needed to build our own. I like the idea of a "custom built to the size I need" case instead of having to settle for something that I'm not fully happy with.
Mystic
2012-04-30 James
Thank you for your DIY instructions sir. My son and I are hooked on making cases for everything now.
2012-06-08 LC
Hi,
Great article! Instruction is very elaborate and easy to follow. I just wanted to know where did you get your materials from? Can I find those parts at Home Depot or Lowes?
Thanks!
2012-06-08 Admin
@LC: Thank you!
Like I said, I get my parts from a local pro audio shop that also sells a bazillion different electronic parts. I'm very lucky to have something so close by (I'm Dutch, BTW), and this very shop is why I got into flightcase building. Home depot or any other "normal" hardware store might have some generic parts, but not the specialized stuff, let alone grooved pop rivets. See my little list at the top of the article for some pointers.
2012-06-11 Andreas
Thanks for this very well written article. I'm wondering if it is worth it to manually craft a flightcase instead of having it build by a flightcase specialist. Could you tell us anything about the savings in terms of the price compared to a manufactured custom case? Would be great to see a rough price comparision.
Thanks!
2012-06-11 Admin
@Andreas: since you seem to be building custom cases yourself (having seen your hidden e-mail address), I think you know the answer: there's no comparison. A ready made standard case is about twice the cost of DIY; a custom built case can be roughly 3-6 times the cost of DIY. It depends a little on the interior; a large custom made foam insert or frame can add a lot to the cost.
In the past I've discussed this with the salesmen at the shop where I buy my parts, and while they also sell cases, they have no option but to agree with me: building yourself is totally worth it, especially if you need something special.
2012-06-14 roland
I am in singapore,can you give a supplier address or telephone nos to contact or email to contact in singapore.
will like to buy some parts.thks
2012-06-15 Richard
Hi - great instructions, thanks for posting.
To attach the extrusion edging, should I drill all the way through the ply (so the rivets go all the way through). Or do you drill blind holes into the ply and the rivets expand inside (in other words like you would use a plastic plug and screw in a concrete or brick wall)?
Sorry if this is a stupid question!
2012-06-15 Admin
@Roland: sorry, mate, but the best person to look for a supplier in Singapore, is you.
@Richard: Not a stupid question. I always drill all the way through because that's easier. If you can afford to have holes on the inside because you're either covering it up or you don't give a damn, then why bother? BTW, a drill stop, which you'll need to get to the right depth, is also going to leave marks.
2012-06-25 Richard
Joris
I notice that sheet materials come in 6.5, 7, 9,10 12mm etc (I am looking at either phenolic coated ply or aluminium-faced "stucco board"). What thickness is best for a box 900 x 400 x 500mm for light-to-medium weight contents? Advice appreciated.
2012-07-25 Carlos
Great article! Have you made those cases with rollers on the bottom? I've seen they have some reinforcements, but I'm not sure how large the reinforcements are and how are they attached to the bottom of the case. Any ideas?
2012-08-18 DJKEET
This is a fine article do you have any info on flight case restoration
Cheers
2012-08-28 Anonymous
You should write technical books...Its clear and easy to understand for a first timer.
Thank you 10000 times!
2012-08-31 Admin
@Anonymous: I wish I had the time!
2012-09-26 Ian UK and Cyprus
Great web site, amazing photos and the information I was looking for. I was a bit worried about the corners, although as you say, they don't have to be perfect as they will be covered up. Now to go a do 'chop job' on my over sized keyboard case.
Many thanks.
2013-01-05 Steve
Just been quoted £650 for a case for me Alesis DM10 Studio electronic drum kit. I'm quite handy with the old tools so I'll be building my own using your brilliant guide. Top stuff.
2013-01-15 Alex (canada)
thank you for such an informative blog, I have learned so much from this page.I was just wondering if you have any info on how to install a sliding shelf inside the case? thank again.
2013-03-02 Jazzy Joel Productions
I have been using POP rivets for a few of my cases however my newly ordered cases have smooth head rivets??? name of this product??? any suggestions?
2013-03-04 Admin
IDK, I guess they're just normal rivets, split rivets, or capped pop rivets. Anyhow, pop rivets are the easiest solution for hand made cases.
2013-03-07 Jason M Rundle
I am planning on constructing (2) individual cases which will be stacked on top of one another and latched to secure them from sliding. I am attempting to create a photo booth enclosure... with much larger style flight cases how can I still ensure strength? Is there something inside very large cases along the corner seems that they use for reinforcement of the box when it becomes much larger than the standard equipment hauling 19in rack cases? If you would, please send your reply to my email also. Also what size laminated product would you go with if constructing a case of this size (approx 3ft high) x2.5ftWx2ft depth? I would like to use a laminate most similar to one used in commercial road cases the smooth black that has a slight sheen to it.
2013-03-09 Robert Davies
Thanks man. You've inspired me to build a case for some dj lighting. Great site.
2013-03-26 Dead Gil
All content on this page is awesome! One question, what do you think of using washers on regular (non-grooved) rivets, on the wood side when attaching the "L" extrusions?
2013-03-26 Tristan
Hey, gonna make my own hopefully. You say make the box first then cut off the lid - great idea, but how would you recommend cutting off the lid? Table saw? Not really sure the proper technique for this, thanks!
2013-05-28 James
It's amazing how expensive some of that hardware is retail. Ball corners are like $0.15 each. Email me if you need pricing but keep in mind, small shipments have high delivery costs.
2013-06-25 Alan
The best way to cut off the lid is with a table saw. Cut 2 long sides all of the way through then adjust the blade to cut only partially through the other 2 sides. Then cut all of the way through with a hand saw.
2013-10-17 Bill
You wouldn't by any chance have a picture or more details about the miter jig that you made? I'm going to make a few cases and would really like to make a jig like you mentioned.
2014-01-03 Dawood Essop
Thanks so much! You're a star.
2014-05-06 Tao
Thanks you so much for the efort putted into this guide .
it is greatly appreciated
2014-10-31 Dave
Hey Thx for the instruction guide. I built a case for our band. You should buy our albumn!
2014-11-23 Ariel Barkan
Thanks a lot!
I built a case for my iMac with your tutorial.
https://www.behance.net/gallery/21517047/Flight-case-for-my-iMac
Regards,
Ariel
2015-08-28 Randall
Saw this posted above:
"2014-10-31 Dave
Hey Thx for the instruction guide. I built a case for our band. You should buy our albumn!"
Dave, I hope you sent the album free in exchange for this great advice helping you build cases for your band! :-)
2016-05-23 Robert M.
Thanks so much for putting this tutorial together. I just purchased a used (new, for me) mixer for the studio I'm putting back together. Was shopping around for a case. Yes, they're expensive and DIY is definitely the way to go for those on a budget that have some skills and know how when it comes to safely using power tools. Your materials list and step-by-step instructions are very valuable.
-
Standard cases seem to use 1/4" plywood. I don't know how well that would protect a 30 inch wide console. Upgrading to 3/8" ply seems to double the (already) expensive price. DIY allows for upgrades for only modest cost.
-
For me, I don't plan on hauling the new mixer around to gigs. I will, however be moving in the near future and will want to protect the gear. My current portable mixer that's used gigging has its own molded plastic case; bought both new together nearly 20 years ago and the mixer continues to work and look as good as new.
No signing up, no censoring, no hassle, no strings attached, no nothing.
Please, English or Dutch only. If you don't really want your message to appear in public, consider contacting me privately.