 Photography
Photo gear flightcase 2
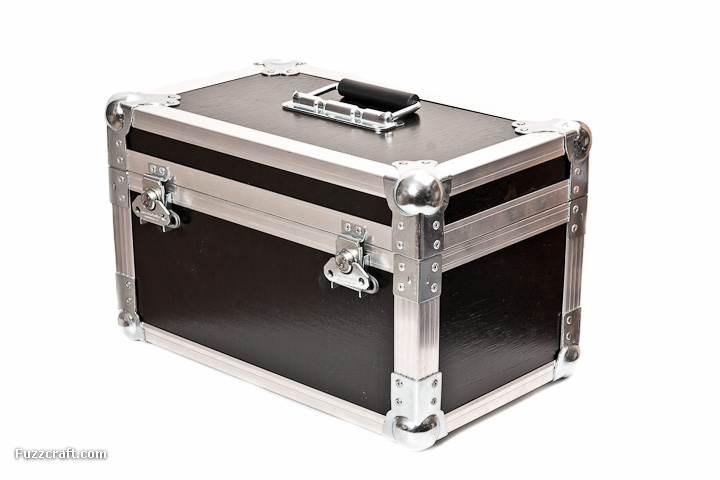
Some time after I finished my photo gear flightcase, and having done over a dozen gigs with it, I couldn't help but notice how large it actually is. It's nice I can take most of my gear with me, but for my concert shoots, I usually just take one SLR, 3 lenses and a flash. Another disadvantage of the case is that it needs to lay flat before it can be opened, which means: not a chance in the world I can open it in front of the stage. It would need too much space and draw too much attention. So I still have to take a bag with lenses.
When I was designing the first case, I set out to build two cases anyway, and bought metal parts accordingly. Back then I didn't yet know what the second case was going to be for, but now I've settled on a second photo case.
So... I'm stuck again with the question of how big it's going to be exactly? I figured I'd make it an upright case, meaning the contents will be standing upright while being separated by padded dividers; much like the way most photo bags work. This way it'll take up the least amount of ground space, perhaps making it possible to do covert operations at the edge of the stage  .
.
The longest lens I own (and I doubt I'll ever need a larger one for concert work) is a 70-200 f/2.8 zoom, measuring 20.5 cm with caps. Inside height including room for shock buffers will be 22.5 cm. Next question: how many lenses would I need room for? I'm guessing I might, in time, get another large fast prime (85mm for instance) to tag along with the 3 lenses I use now, and maybe another small prime. Smaller lenses can be stacked with back-to-back lens caps or horizontal dividers, so I'd need 3 storage slots for 5 lenses. Then there's the gripped camera body and a flash. I think I'll make one lens slot only half depth so the camera can sit in the case with a small lens attached, ready to grab. I usually take some small accessories like spare batteries, a flash stand, radio triggers and a memory case, so there's gonna be a little extra room for those too. Maybe I'll get a second battery charger and install it permanently.
I laid out the stuff for a concert shoot on a flat surface and started shifting around. After some shifting and stacking, I decided on a 2 by 2 layout of 10 cm squares with a camera body compartment and an extra 5 cm wide compartment for accessories. So with dividers and padding this works out to 40 by 23 cm inside dimensions. A layout sketch:
| Camera body | Lens 1 | Lens 2 | |
| Flash | Lens 3 |
This case will easily come out of a single standard 61 x 122 cm sheet, including the divider panels. The circumference of the case along the front, sides and back will be 42 + 25 + 42 + 25 cm = 134 cm. This length of location extrusion will be needed. Twice this amount of edge lining will be needed for bottom, lid, and some extra for the sides, so I'll need about 3 m.
Panel dimensions (9 mm plywood):
- Top and bottom: 40 x 23 cm
- Front and back: 40 x 24.2 cm
- Left and right: 24.2 x 24.8 cm
Bill of materials:
- 1 sheet of 61 x 122 cm x 9 mm plywood (€11)
- 2 m male+female location extrusion (€9)
- 4 m single angle extrusion (€8)
- 8 ball corners (€12)
- 4 L-braces (€2.5)
- 2 strut hinges (€5)
- 2 butterfly latches (€9)
- 1 flip handle (€2.5)
Total cost: about €60, padding not included
Since this case is going to be handled by the lid, I though it best to use butterfly latches. And since the case is not going to be on top of, or next to, other cases, I'm using surface mounted latches. These may be hard to get by in retail. What I did was remove the dish of a recessed latch, so I could just pop them on, surface mounted. To prevent inadvertent dislocation of the case and lid, and for added strength, I'll be using strut hinges again. So with all the calculations ready, let's hit it off. I'm going to follow the step-by-step plan from my own flightcase DIY page. But since I'm not using recessed latches, and casters aren't needed, steps 4 and 10 are omitted.
Click thumbnails to zoom in. Click again to zoom out, or use cursor keys to walk through all images.

1. Constructing a closed box out of plywood, using hardwood ply, white glue and 25 mm nails. The panel I got was slightly warped, so tacks didn't hold very well and I resorted to using nails. Allow glue to set

2. Separation of top and bottom, marking the two parts with arrows on the inside, to make absolutely sure as to how they fit best.

3. Painting the parts with primer and two coats of scratch proof black poly-urethane paint. Edges receive no effort.
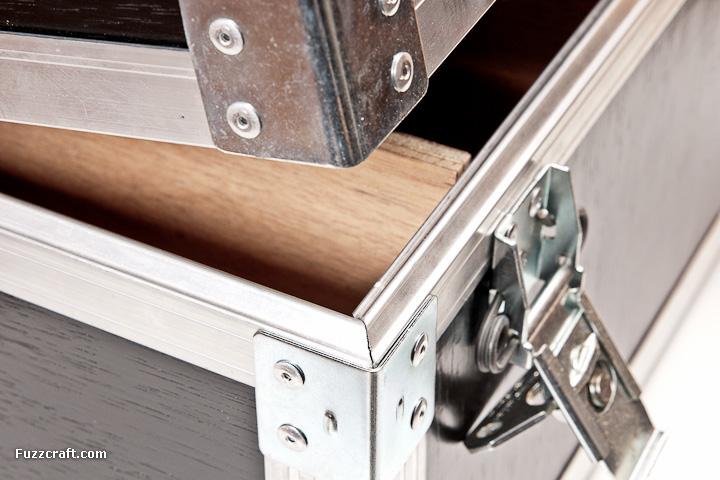

5. Miter sawn location extrusions between the top and bottom parts.

6. L-extrusions to protect the edges.

7. L-braces to protect against skin cuts.
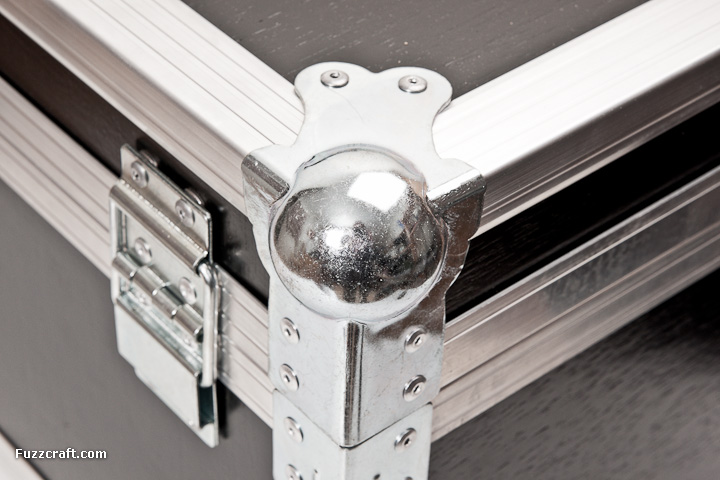
8. Ball corners. I chose to use the same corners as the first case. It makes for an easier costruction of the lid, and they are sturdier to begin with.
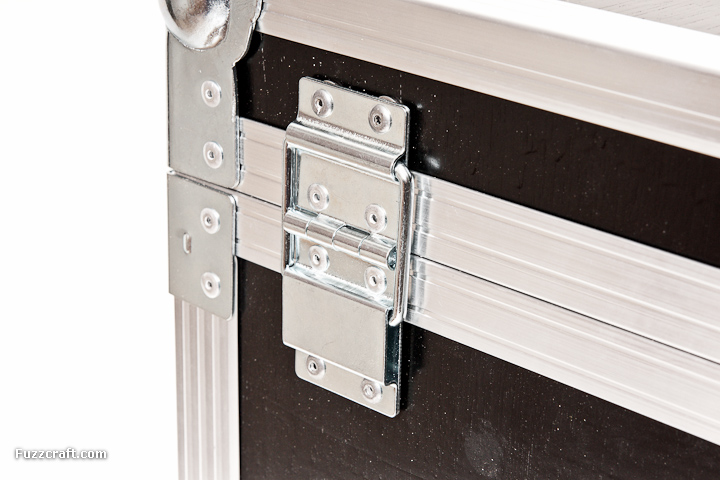

9. Strut hinges on the back side, butterfly latches on the front (with steel washers underneith to prevent skewing) and a flip handle on top.

The result. Exterior and raw interior. As you can see, I already put in the main dividers. Actually, I did that even before I started popping on the metal parts.

Cutting pieces of self adhesive neoprene foam padding (I get this stuff for free), and a piece of egg crate foam for the lid.
Now you can start to see how I laid it out eventually. There are 3 deep compartments for lenses and a flash unit. The fourth lens compartment is only half as deep while it's connected to the camera body compartment, so the camera can be stored with a lens attached. The camera will be sitting on top of a removable horizontal panel, under which some small stuff can be put. And finally, to the left, there's a separate, sealed compartment for larger accessories.

Packed and ready to go.
Fuzzcraft.com comment system 1.1
2012-02-14 Laurenz
Joris, Ik lees nu pas dit artikel... Net wat ik in gedachten had :D
Ik ga er dan ook maar eens m'n werk van maken.
2012-10-21 Roberto
it was indeed a clear explanation and plus point to the photo's included, i might build one for my camera and other equipment when i finally find a supplier for the parts, it's almost been a month now and still i couldn't find one, i am Dubai, UAE. Thank you for your tutorial
2012-12-29 dashuria kitarë
Raste Te TUA Jane te këndshme. Ju falënderoj për këshilla TE Mira / Dashurie NGA Shqipëria
2016-05-15 Dan
Where can I find the hardware to build a box like this? Thank you! :-)
No signing up, no censoring, no hassle, no strings attached, no nothing.
Please, English or Dutch only. If you don't really want your message to appear in public, consider contacting me privately.